


今天来给大家分享一个小教程,基于
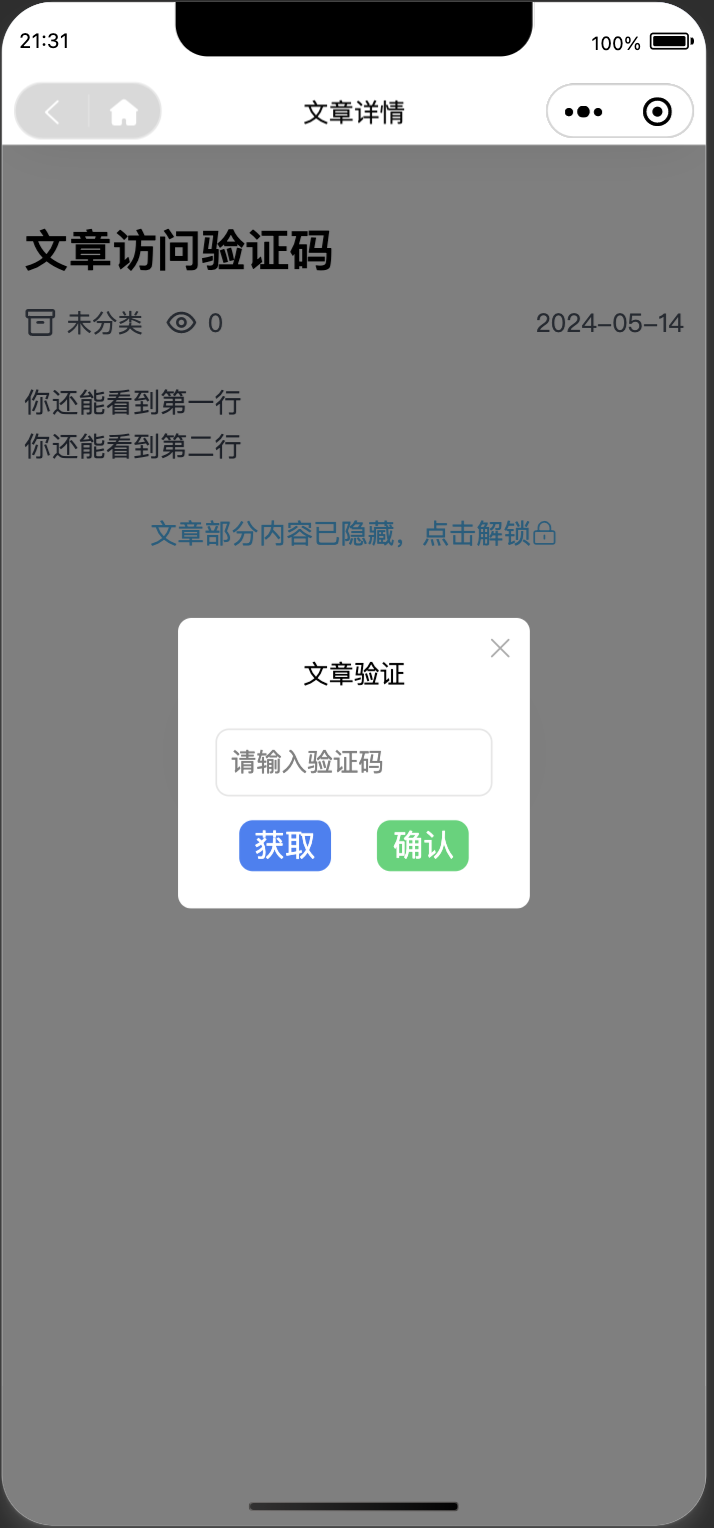
TinyTale小程序实现文章访问验证码功能,先上演示。
注意:版本以后更新了api,请注意同步修改,参考【plugin-tools-1.2.2 更新api,导致小程序文章验证码失败?】。
功能演示:

功能实现:
一、要求:
二、代码修改
第一步,找到src/pages/about/index.vue页面,(注:这一步非必须,我们在第二步的3点中优化了代码,所以第一步可以不做)在页面中插入如下代码:
uni.setStorageSync('openid',res.openid);如图所示:

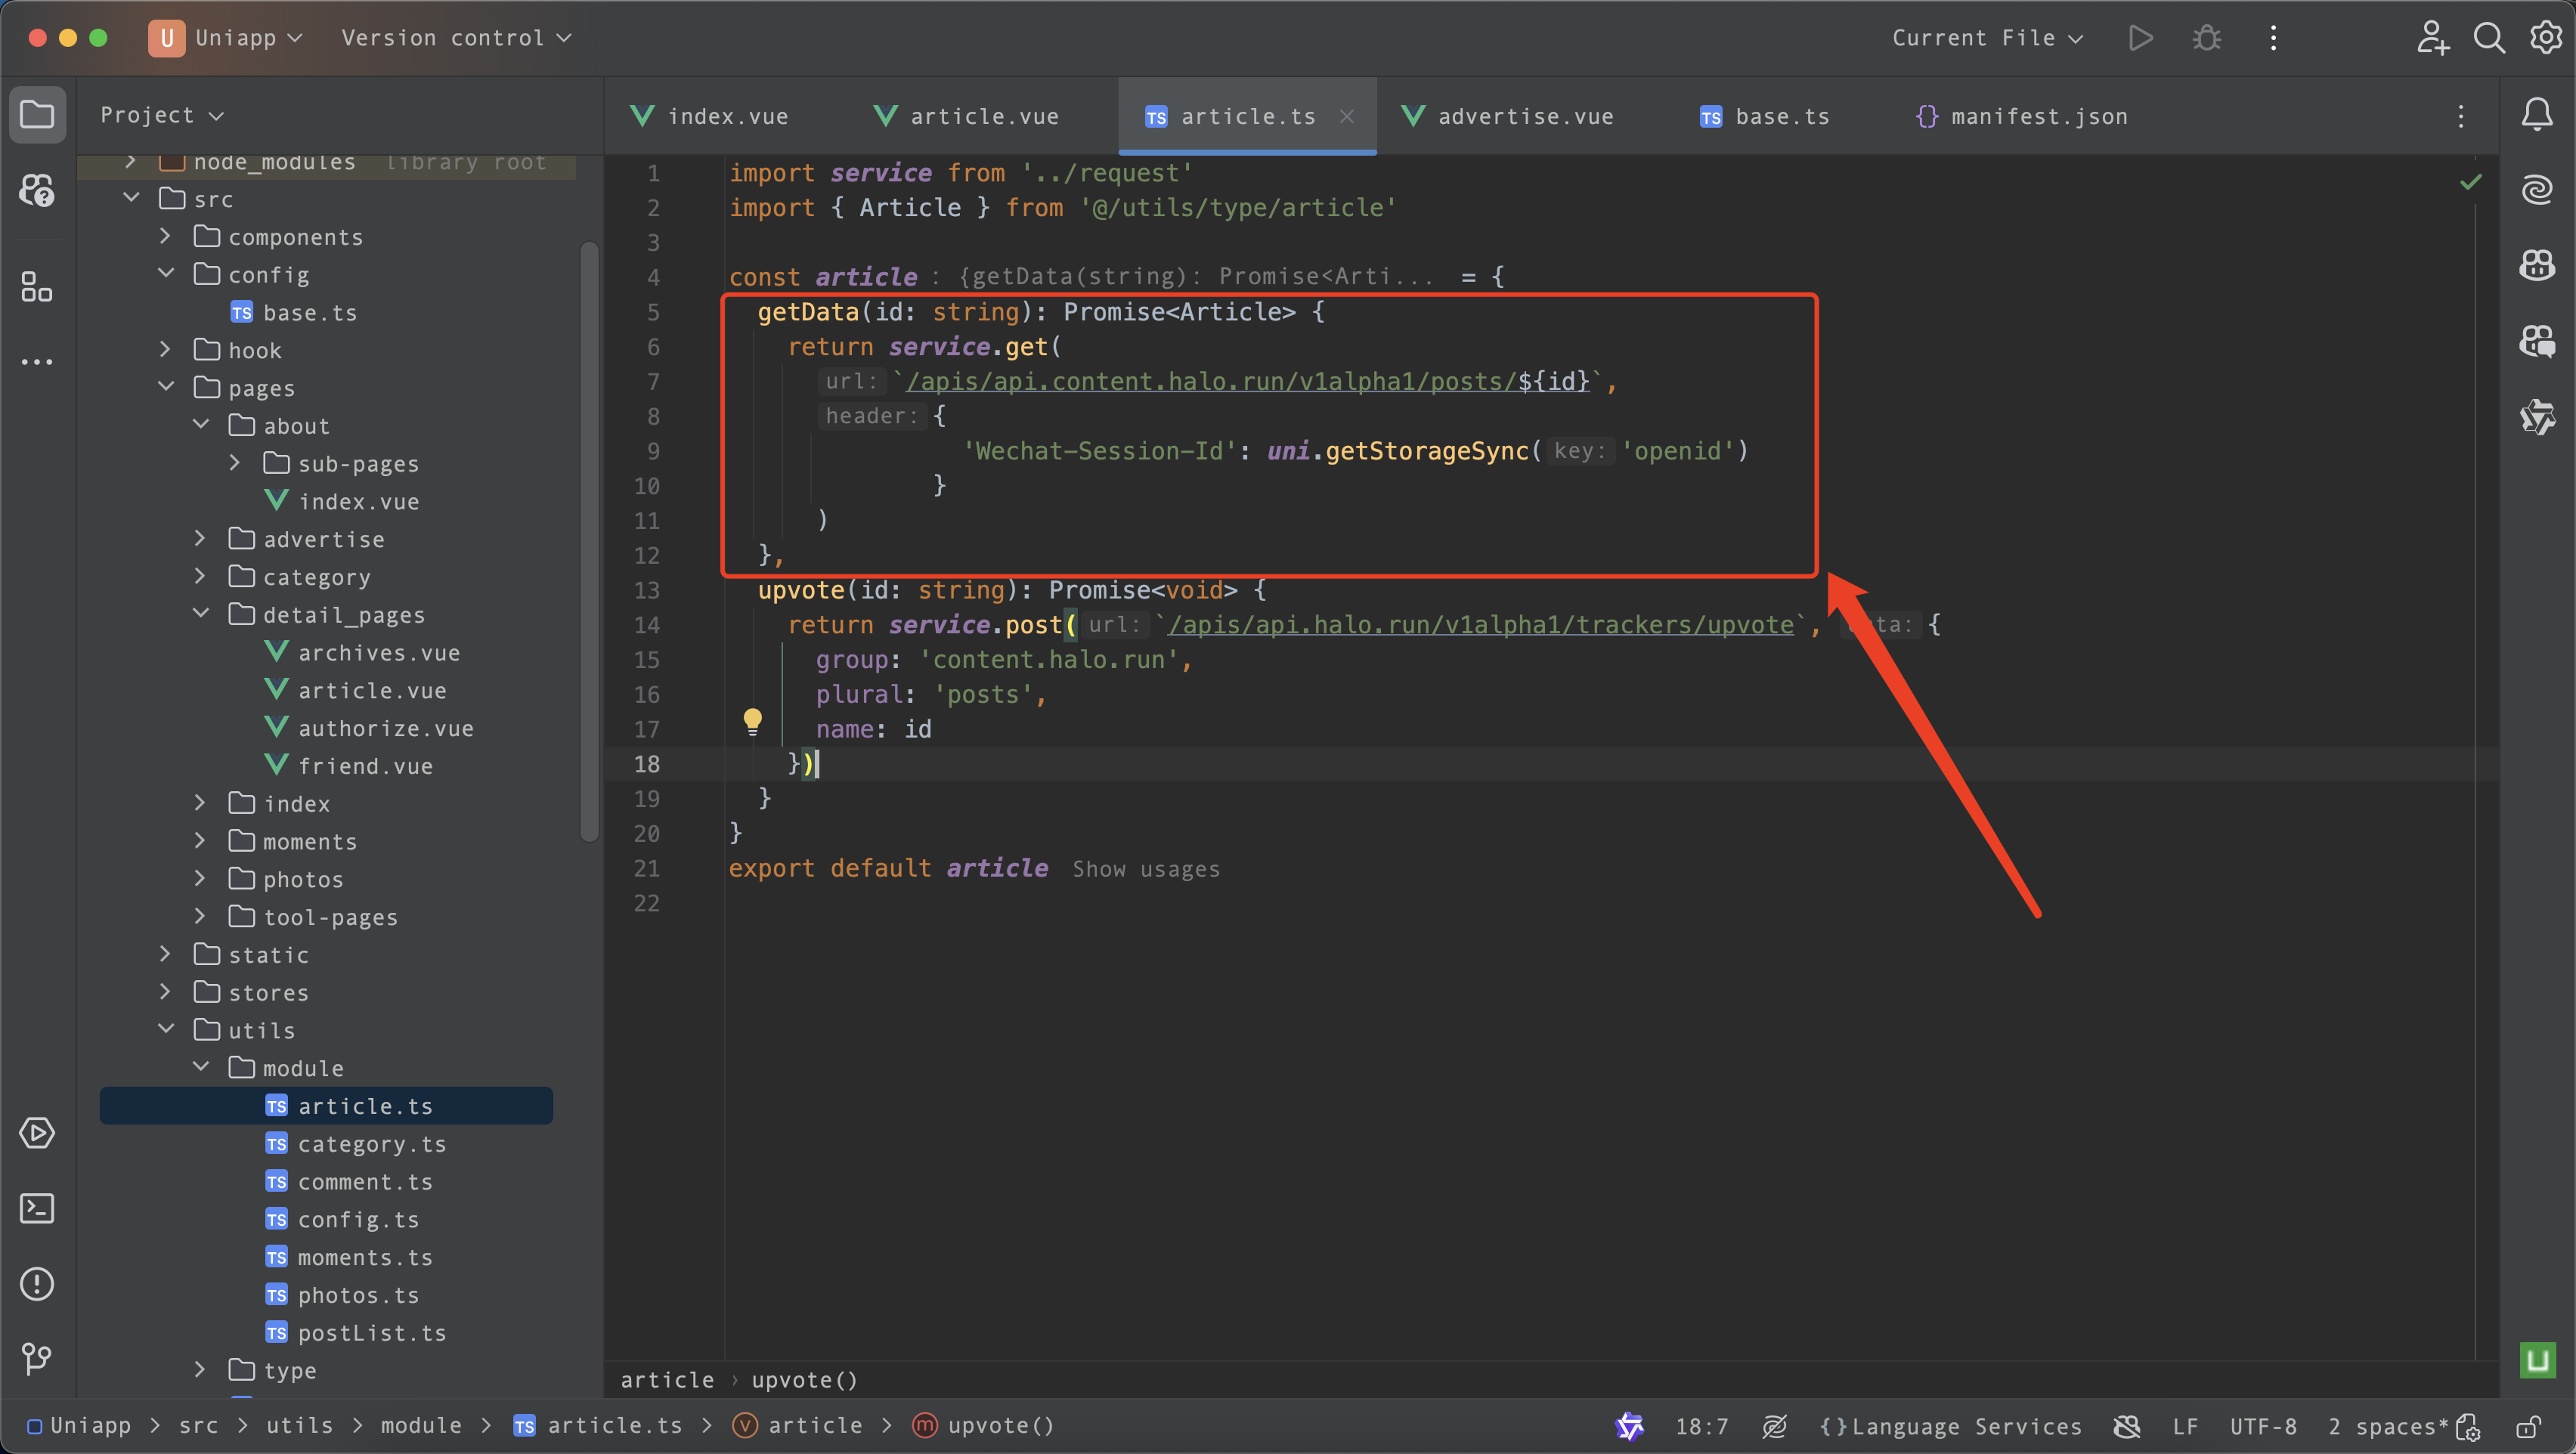
第二步,改造文章详情页面
先找到
src/utils/module/article.ts文件,直接改造getData方法,代码如下:
getData(id: string): Promise<Article> {
  return service.get(
    `/apis/api.content.halo.run/v1alpha1/posts/${id}`,
    {
    	'Wechat-Session-Id': uni.getStorageSync('openid')
    })
},
如图所示:
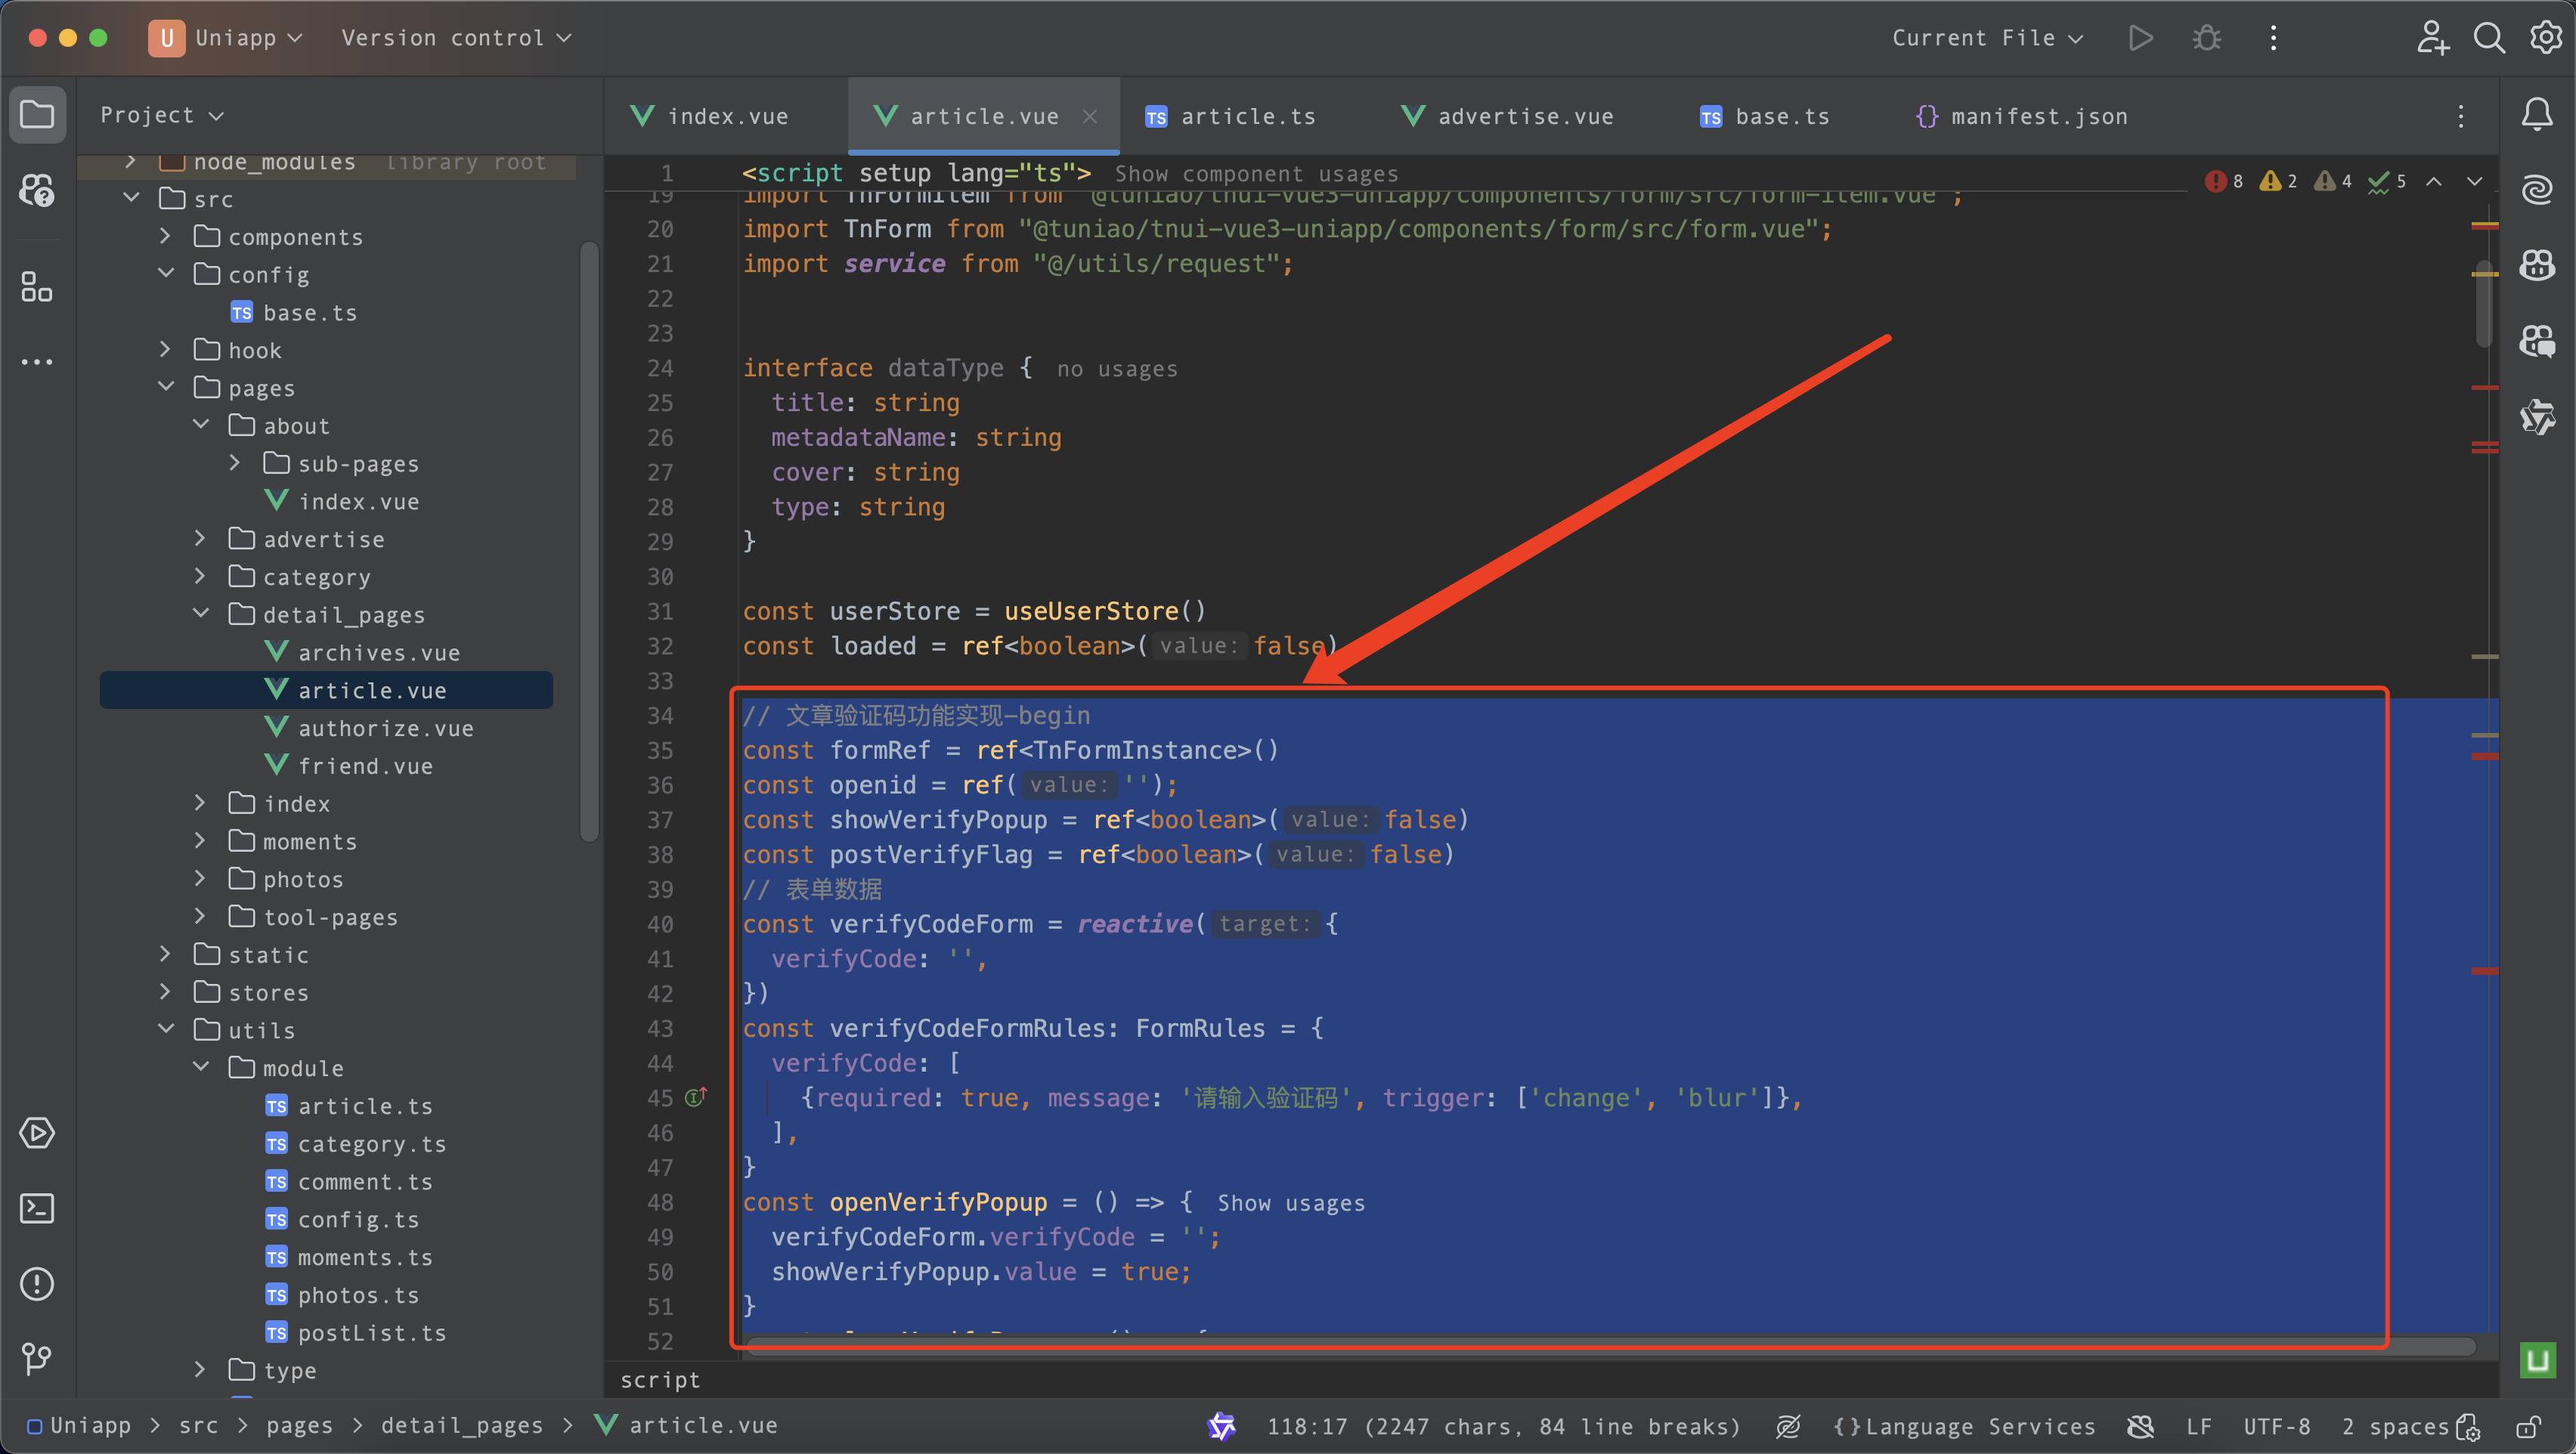
然后我们找到
src/pages/detail_pages/article.vue页面,插入如下代码:
// 文章验证码功能实现-begin
const formRef = ref<TnFormInstance>()
const openid = ref('');
const showVerifyPopup = ref<boolean>(false)
const postVerifyFlag = ref<boolean>(false)
// 表单数据
const verifyCodeForm = reactive({
  verifyCode: '',
})
const verifyCodeFormRules: FormRules = {
  verifyCode: [
    {required: true, message: '请输入验证码', trigger: ['change', 'blur']},
  ],
}
const openVerifyPopup = () => {
  verifyCodeForm.verifyCode = '';
  showVerifyPopup.value = true;
}
const closeVerifyPopup = () => {
  verifyCodeForm.verifyCode = '';
  showVerifyPopup.value = false;
}
const goToGetCode = () => {
  verifyCodeForm.verifyCode = ''
//   前往获取验证码页面
  uni.navigateTo({
    url: '/pages/advertise/advertise',
  })
}
const restrictReadFlag = (art: Article) => {
  let restrictReadEnable = art?.metadata?.annotations?.restrictReadEnable === 'true';
  if (restrictReadEnable) {
    let content = art.content.content;
    return content.includes('<!-- restrictRead start -->');
  } else {
    return false;
  }
}
const checkVerifyCode = () => {
  formRef.value?.validate((valid: boolean) => {
    if (valid) {
      uni.showLoading({
        title: '正在校验...'
      });

      service.get(
        `/tools/verificationCode/check?code=${verifyCodeForm.verifyCode}`,
        {
          'Authorization': 'Tools工具箱插件设置的认证token',
          'Wechat-Session-Id': uni.getStorageSync('openid'),
          'Post-Id': articleData.value?.metadata?.name
        },
      ).then((res) => {
          if (res.code == 200) {
            uni.showToast({
              title: '校验成功!',
              icon: 'success'
            });
            closeVerifyPopup()
            try {
              uni.redirectTo({
                url:
                  '/pages/detail_pages/article?metadataName=' +
                  metadataName.value +
                  '&title=' +
                  title.value
              })
            } catch (e) {
              // error
            }
          } else {
            uni.showToast({
              title: '校验失败!',
              icon: 'error'
            });
          }
          uni.hideLoading();
        }).catch((err) => {
        console.log("校验失败", err);
        uni.hideLoading();
      });
    }
  })
}
// 文章验证码功能实现-end
代码插入位置如图所示:
接下来插入代码:
    // 文章验证码功能实现-begin
    openid.value = uni.getStorageSync('openid')
    if (openid.value == '' || openid.value == null) {
      uni.login({
        provider: 'weixin',
        success: function (loginRes) {
          try {
            baseConfig.getVerify(loginRes.code).then((res) => {
              uni.setStorageSync('openid', res.openid)
              if (res.result) {
                useUserStore().setAdmin(res.result)
              }
            })
          } catch (error) {
            console.log(error)
          }
        }
      })
    }
    if (restrictReadFlag(res)) {
      // 截取指定字符串之前的内容
      res.content.content = res.content.content.split(
        '<!-- restrictRead start -->'
      )[0]
      res.content.raw = res.content.raw.split('<!-- restrictRead start -->')[0]
      postVerifyFlag.value = true
    }
    // 文章验证码功能实现-end
代码插入位置如图所示:

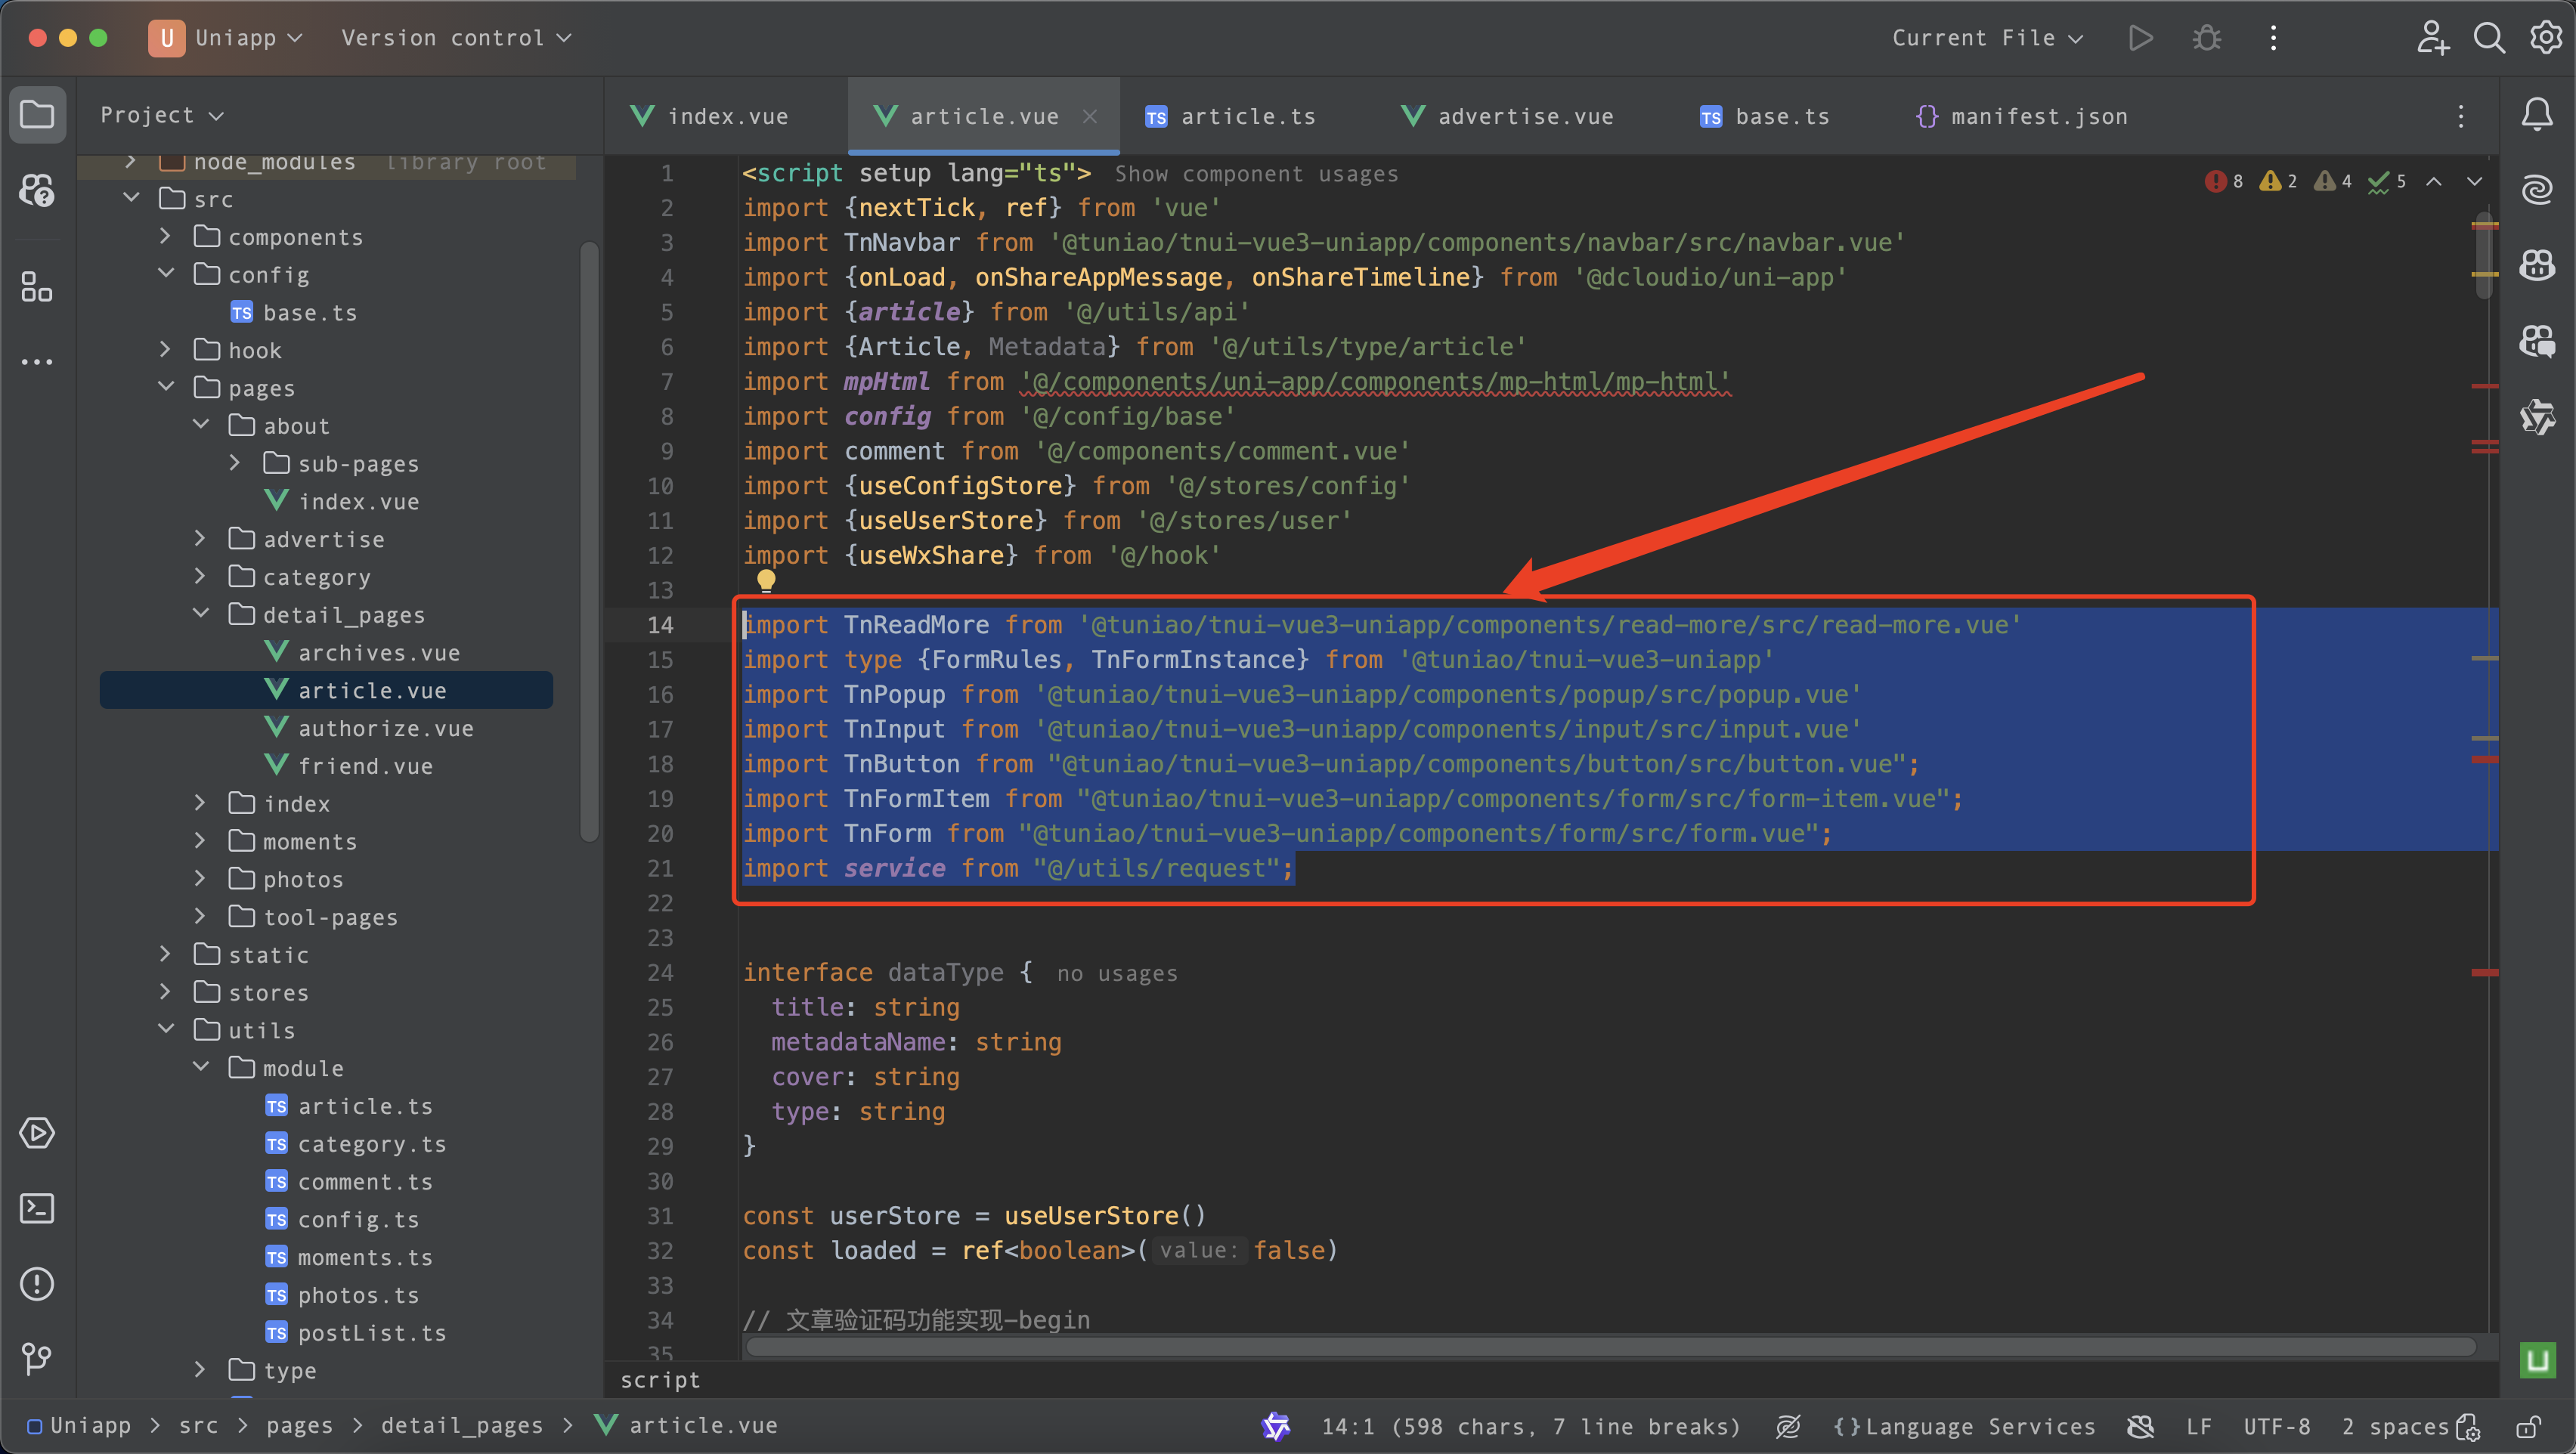
然后我们页面中引入必要的组件:
import TnReadMore from '@tuniao/tnui-vue3-uniapp/components/read-more/src/read-more.vue'
import type {FormRules, TnFormInstance} from '@tuniao/tnui-vue3-uniapp'
import TnPopup from '@tuniao/tnui-vue3-uniapp/components/popup/src/popup.vue'
import TnInput from '@tuniao/tnui-vue3-uniapp/components/input/src/input.vue'
import TnButton from "@tuniao/tnui-vue3-uniapp/components/button/src/button.vue";
import TnFormItem from "@tuniao/tnui-vue3-uniapp/components/form/src/form-item.vue";
import TnForm from "@tuniao/tnui-vue3-uniapp/components/form/src/form.vue";
import service from "@/utils/request";
import { baseConfig } from '@/utils/api';
代码插入位置如下:
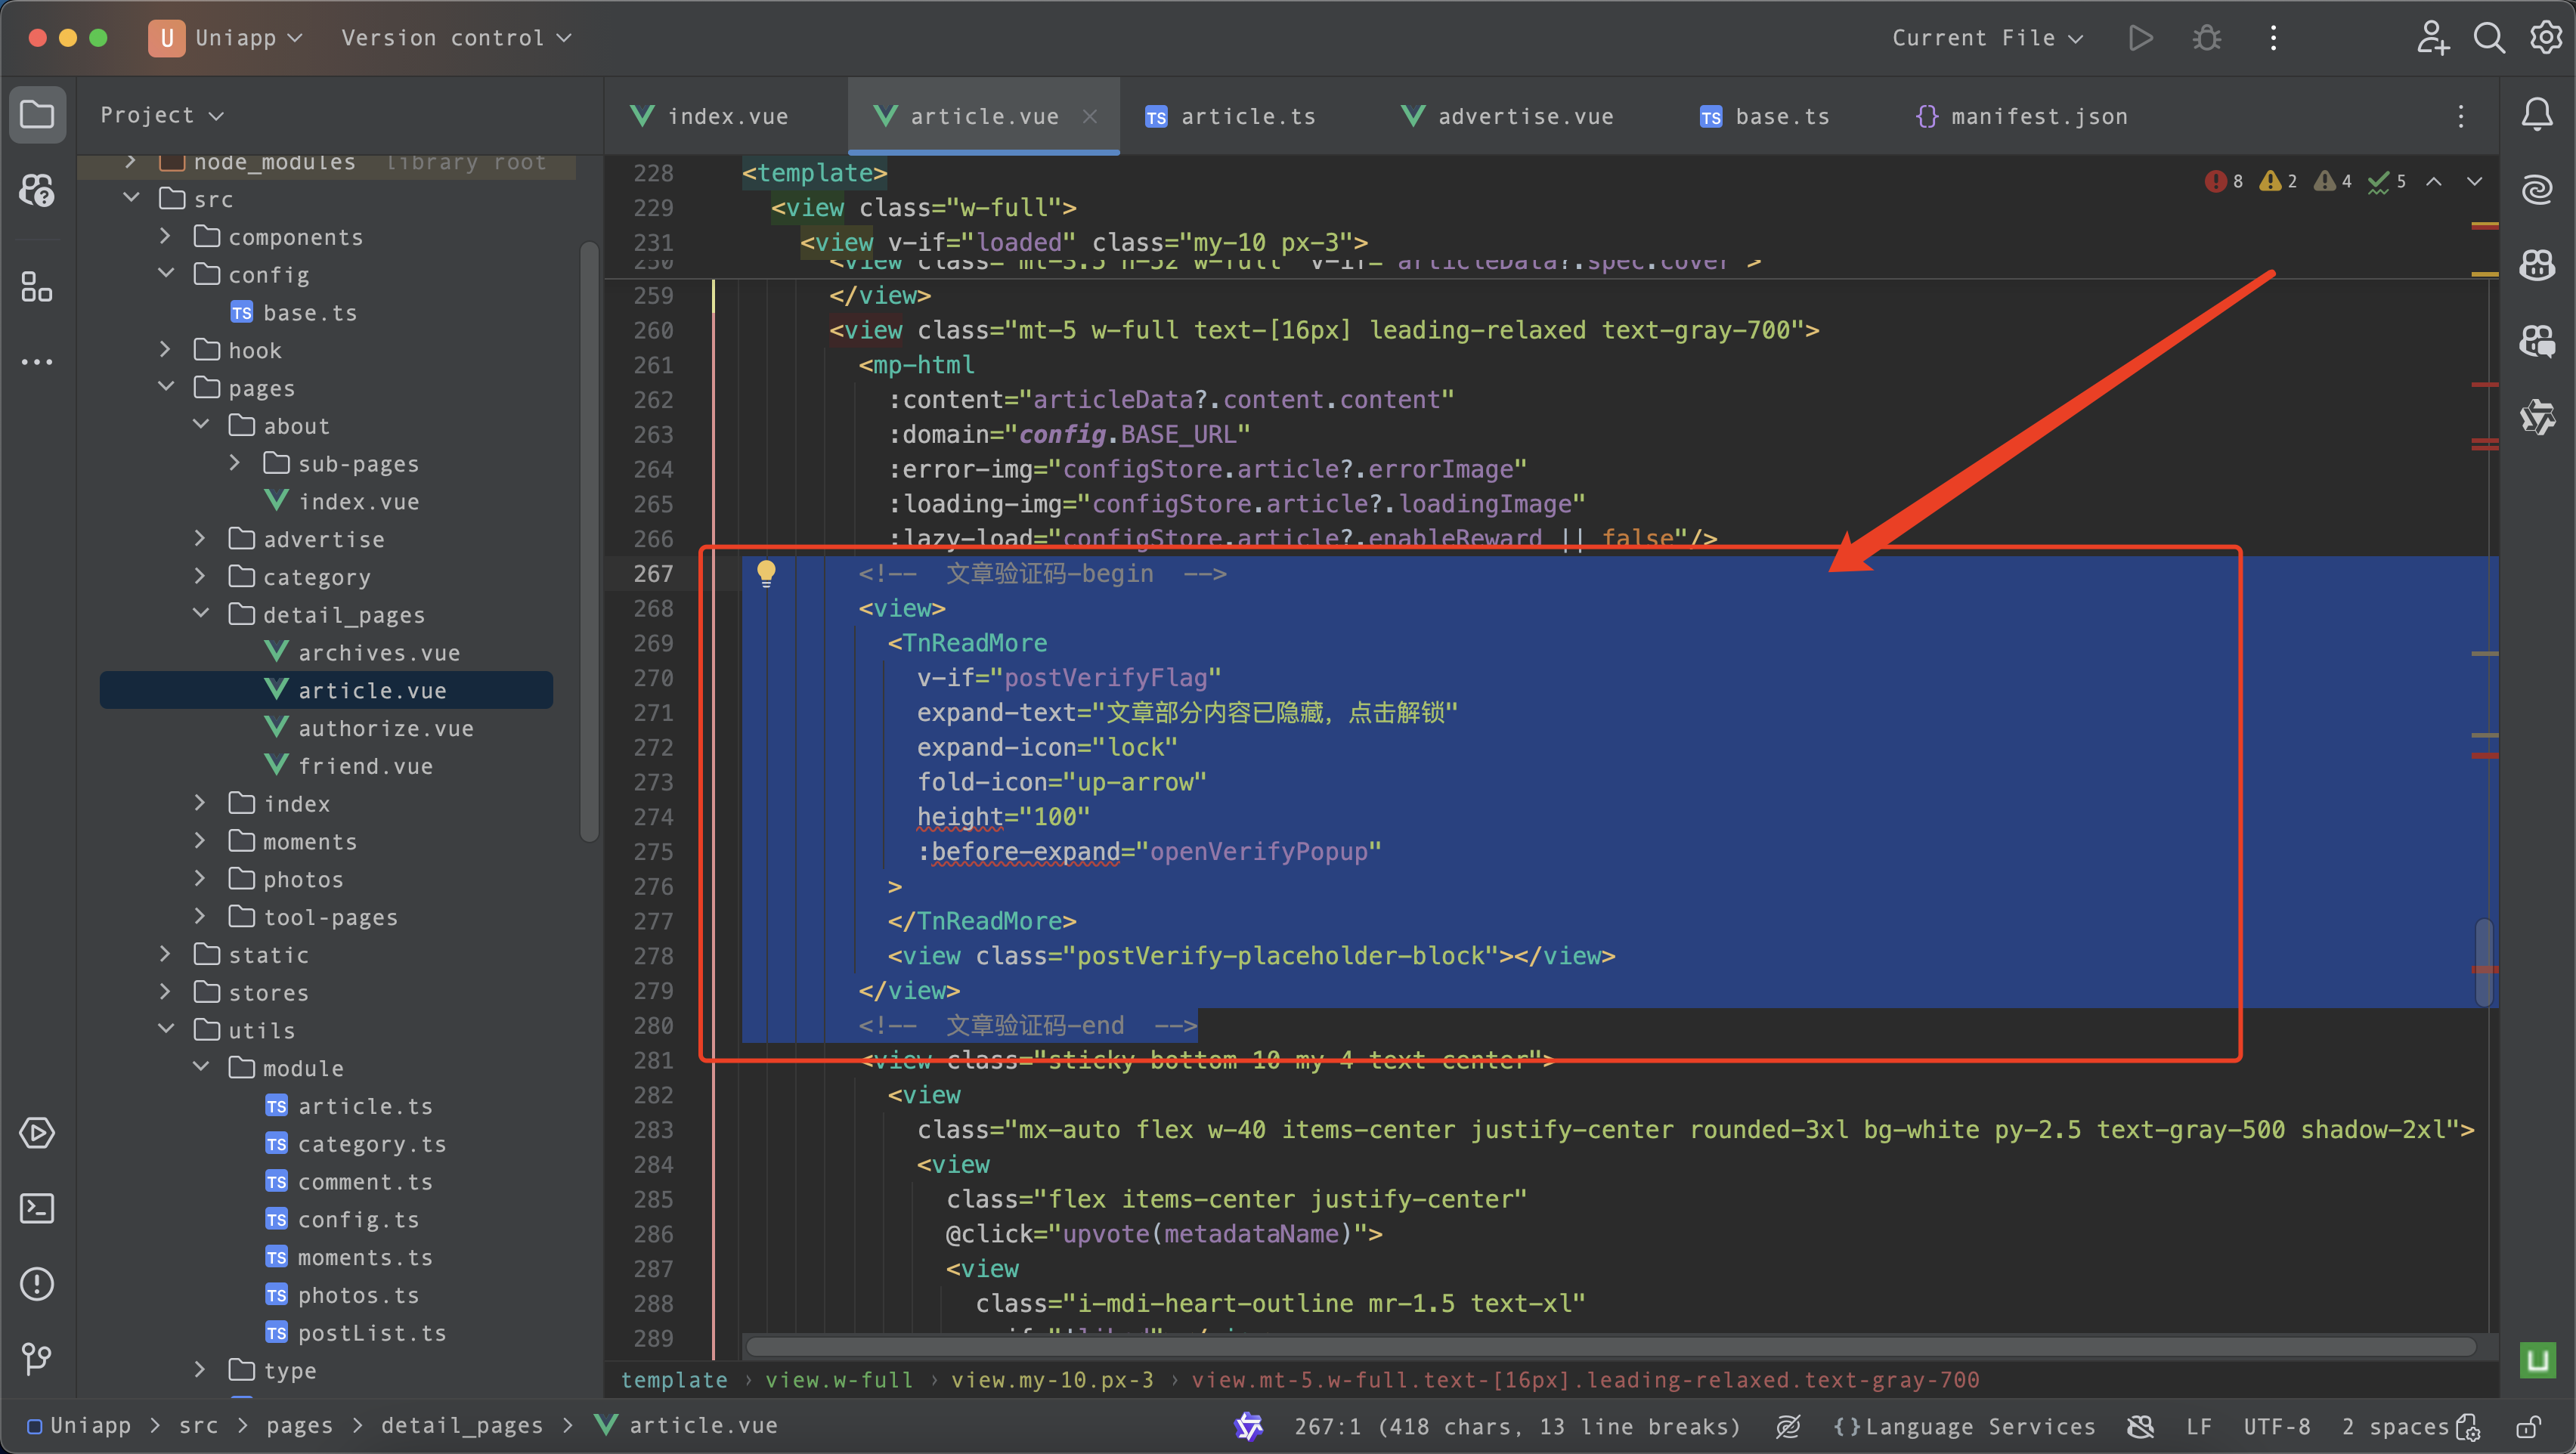
脚本代码改造完毕之后,我们需要改造内容,插入隐藏提示内容
<!--  文章验证码-begin  -->
<view>
  <TnReadMore
    v-if="postVerifyFlag"
    expand-text="文章部分内容已隐藏,点击解锁"
    expand-icon="lock"
    fold-icon="up-arrow"
    height="100"
    :before-expand="openVerifyPopup"
  >
  </TnReadMore>
  <view class="postVerify-placeholder-block"></view>
</view>
<!--  文章验证码-end  -->
代码插入位置如图所示:
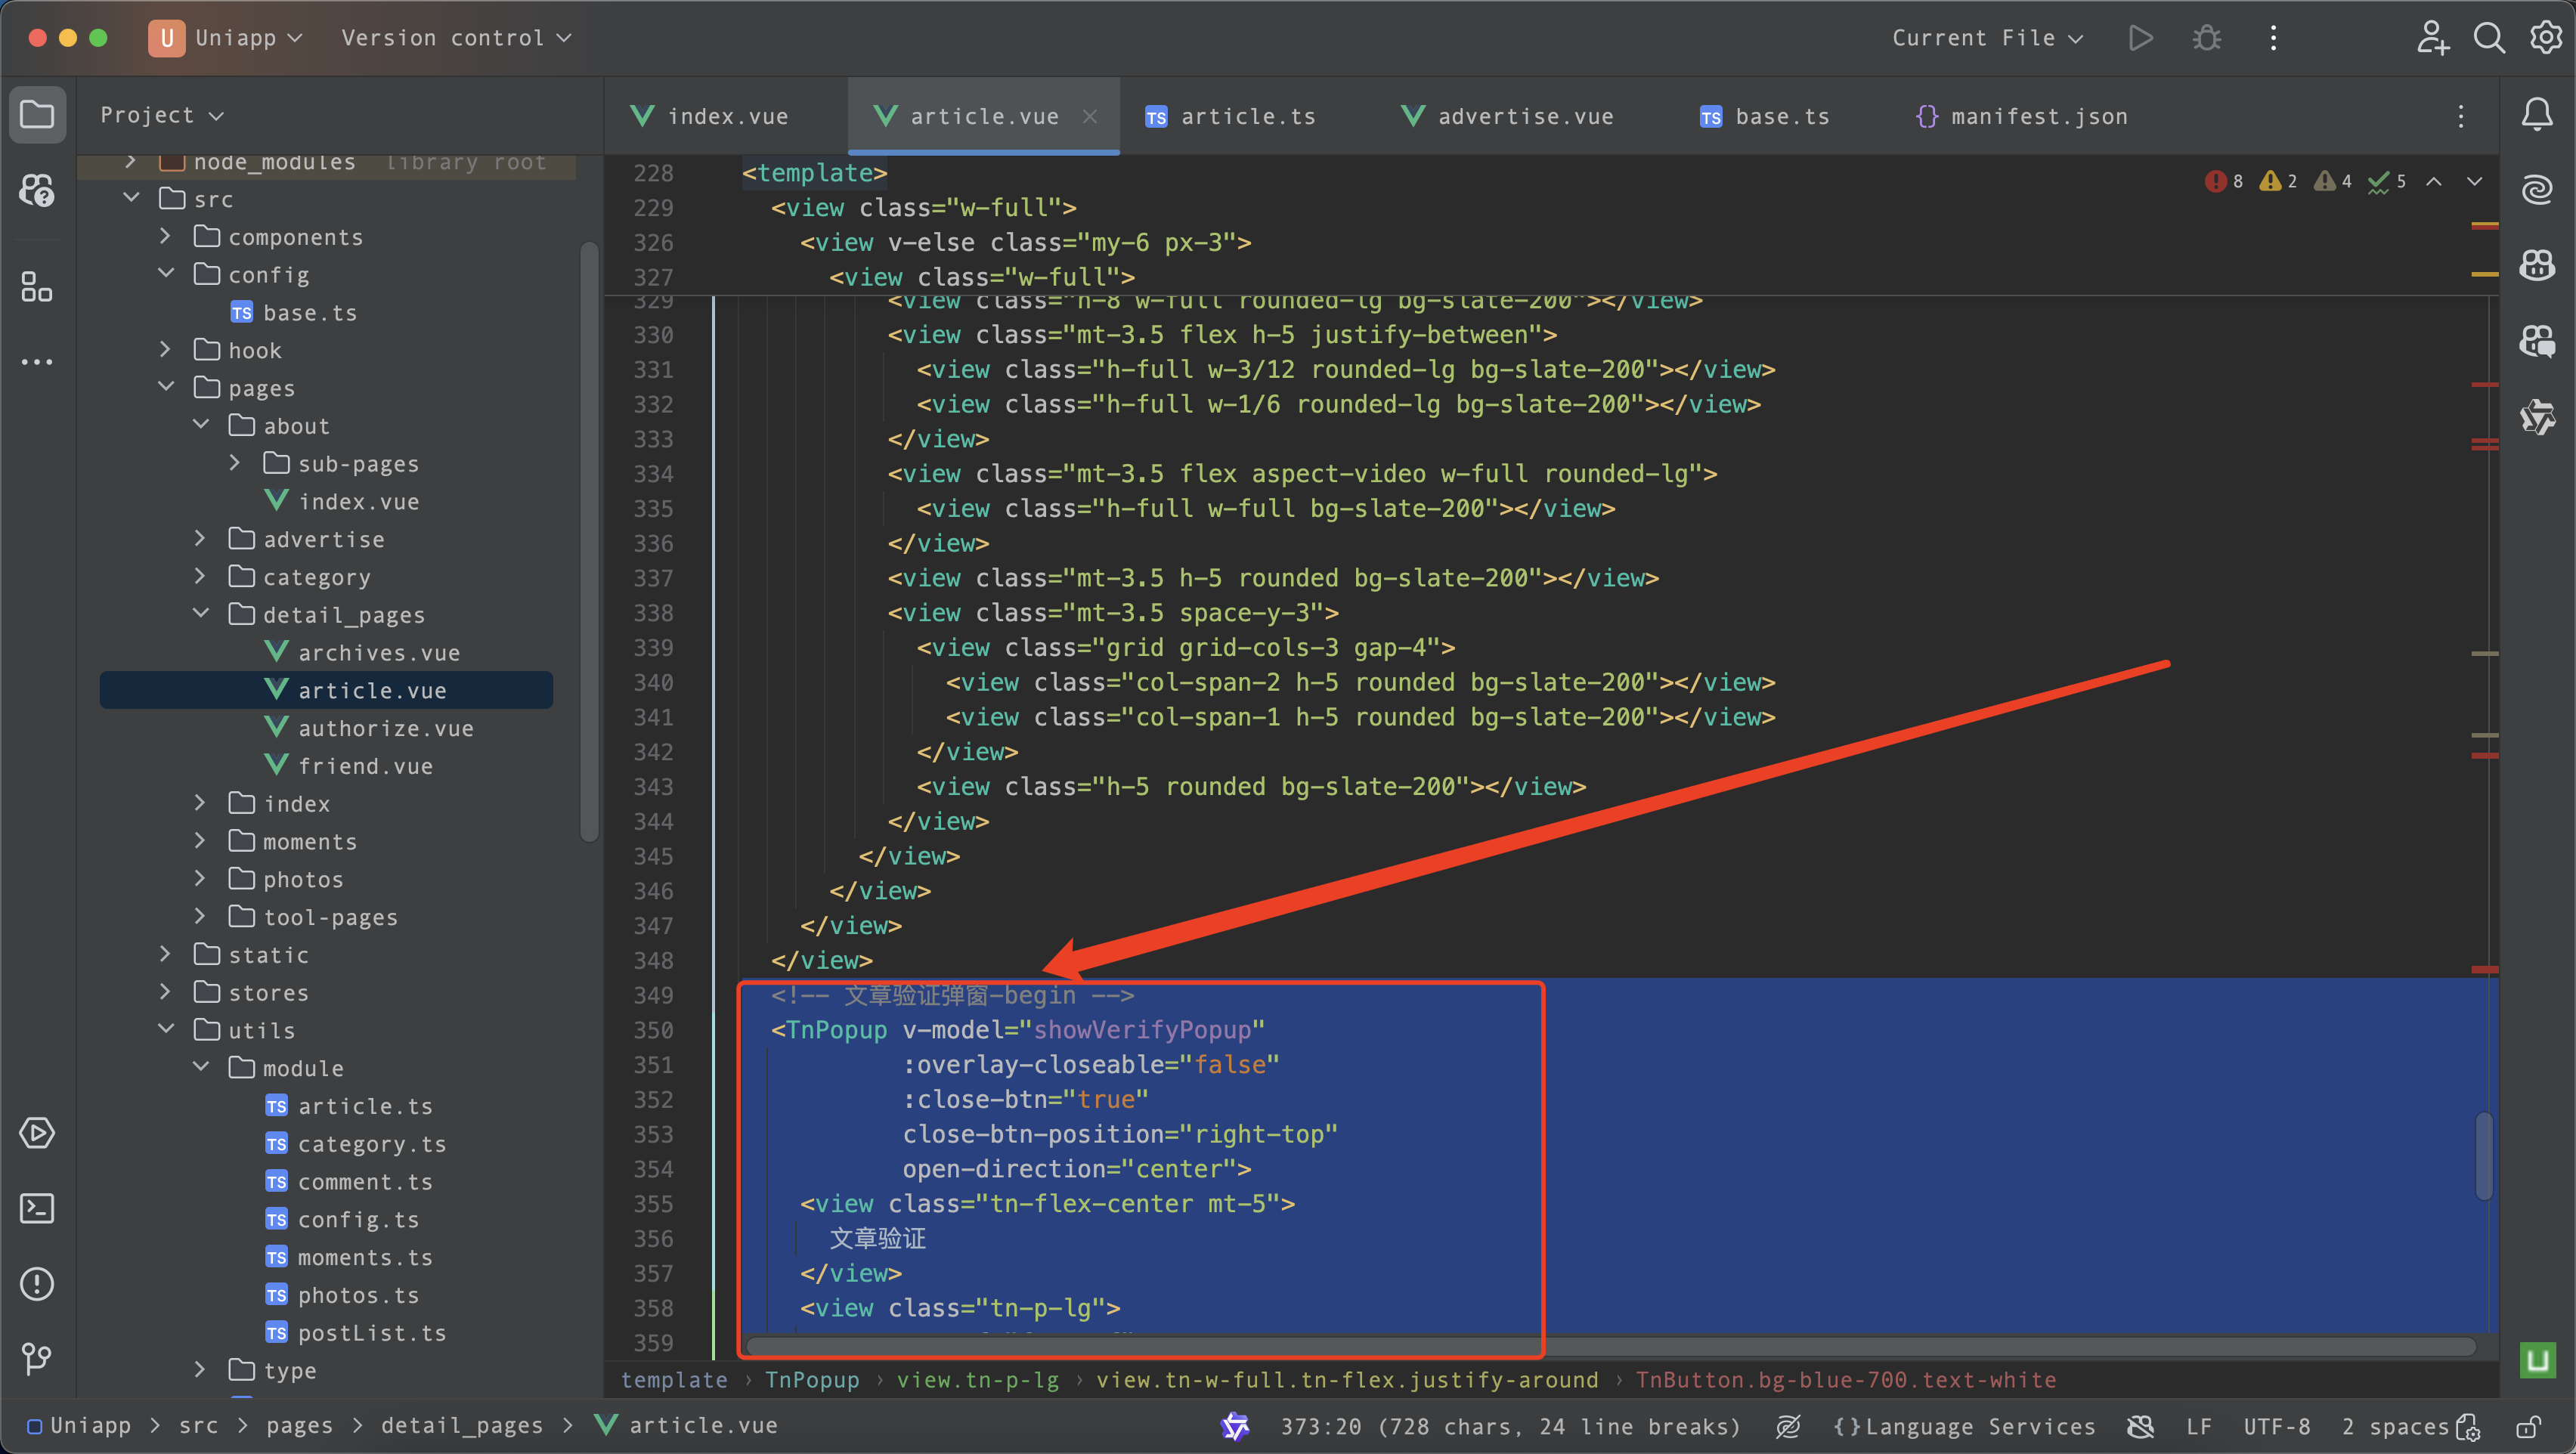
插入验证码弹窗,代码如下:
<!-- 文章验证弹窗-begin -->
<TnPopup v-model="showVerifyPopup"
         :overlay-closeable="false"
         :close-btn="true"
         close-btn-position="right-top"
         open-direction="center">
  <view class="tn-flex-center mt-5">
    文章验证
  </view>
  <view class="tn-p-lg">
    <TnForm ref="formRef"
            :model="verifyCodeForm"
            :rules="verifyCodeFormRules"
    >
      <TnFormItem prop="verifyCode">
        <TnInput
          v-model="verifyCodeForm.verifyCode"
          type="text"
          placeholder="请输入验证码"
          clearable/>
      </TnFormItem>
    </TnForm>
    <view class="tn-w-full tn-flex justify-around">
      <TnButton
        size="lg"
        @click="goToGetCode"
        bg-color="#3b82f6"
        text-color="#fff"
        class="bg-blue-700 text-white">
        获取
      </TnButton>
      <TnButton
        size="lg"
        @click="checkVerifyCode"
        bg-color="#2ed573"
        text-color="#fff"
        class="bg-blue-700 text-white">
        确认
      </TnButton>
    </view>
  </view>
</TnPopup>
<!-- 文章验证弹窗-end -->
代码插入位置如图所示:
另外我们需要补充一些样式代码:
.postVerify-placeholder-block {
  height: 80rpx;
  width: 1rpx;
}
代码插入位置如图所示:

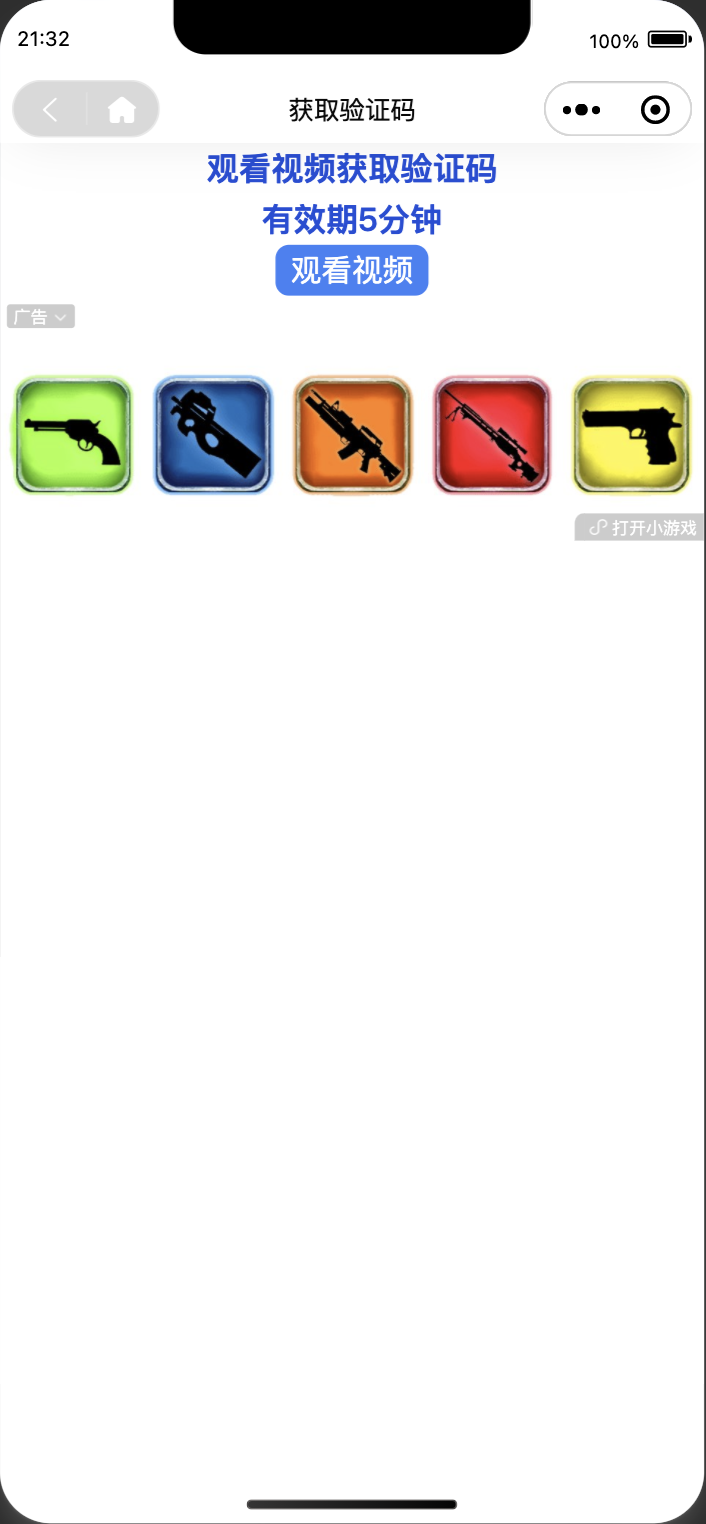
第三步,新增广告页面
在
pages目录下新增页面src/pages/advertise/advertise.vue,代码如下:
<template>
<view class="w-full">
<TnNavbar fixed>获取验证码</TnNavbar>
<view>
<view class="px-3">
<view class="text-center text-lg font-bold">
<view class="text-blue-700">
{{ codeData.title }}
</view>
<view class="text-blue-700" v-if="codeDataShow">
{{ codeData.time }}
</view>
</view>
</view>
<view class="text-center" v-if="!codeDataShow">
<TnButton
size="lg"
@click="openVideoAd"
bg-color="#3b82f6"
text-color="#fff"
class="bg-blue-700 text-white">
观看视频
</TnButton>
</view>
<view class="text-center" v-if="codeDataShow">
<TnButton
size="lg"
@click="fnCopyCode"
bg-color="#3b82f6"
text-color="#fff"
class="bg-blue-700 text-white">
复制
</TnButton>
</view>
<ad unit-id="adunit-fb7bffbc6c2a3623" bindload="adLoad" binderror="adError" bindclose="adClose"></ad>
</view>
</view>
</template>
<script>
import TnNavbar from '@tuniao/tnui-vue3-uniapp/components/navbar/src/navbar.vue'
import TnButton from "@tuniao/tnui-vue3-uniapp/components/button/src/button.vue";
import service from "@/utils/request";
let videoAd = null;
export default {
components: {
TnNavbar,
TnButton,
},
data() {
return {
adUnitId: '微信小程序激励广告id',
codeDataShow: false,
codeData: {
title: "观看视频获取验证码",
time: '有效期5分钟',
}
}
},
onLoad(options) {
// #ifdef MP-WEIXIN
wx.hideShareMenu();
this.adLoad();
// #endif
},
methods: {
adLoad() {
if (wx.createRewardedVideoAd) {
videoAd = wx.createRewardedVideoAd({
adUnitId: this.adUnitId //你的广告key
})
videoAd.onError(err => {
})
videoAd.onClose((status) => {
if (status && status.isEnded || status === undefined) {
//这里写广告播放完成后的事件
this.getVerifyCode();
} else {
// 广告播放未完成
uni.showToast({
icon: 'error',
title: '获取失败!'
});
}
})
}
},
openVideoAd: function () {
if (videoAd && this.adUnitId != '') {
videoAd.show().catch(err => {
// 失败重试
console.error("广告拉取失败")
videoAd.load().then(() => videoAd.show())
})
} else {
this.getVerifyCode();
}
},
getVerifyCode() {
uni.showLoading({
title: '正在获取...'
});
service.get(
`/tools/verificationCode/create`,
{
'Authorization': 'Tools工具箱插件设置的认证token'
}
).then((res) => {
if (res.code == 200) {
this.codeData.title = res.data;
this.codeDataShow = true;
} else {
uni.showToast({
icon: 'error',
title: '获取失败!'
});
}
uni.hideLoading();
}).catch((err) => {
console.error("获取验证码失败", err);
uni.showToast({
icon: 'error',
title: '获取失败!'
});
uni.hideLoading();
});
},
fnCopyCode() {
uni.setClipboardData({
data: this.codeData.title,
// showToast: false,
success: (res) => {
console.log("复制成功", this.codeData.title)
uni.showToast({
icon: 'success',
title: '复制成功!'
});
setTimeout(() => {
uni.navigateBack();
}, 500);
},
fail: (err) => {
console.log("复制失败", err)
uni.showToast({
icon: 'error',
title: '复制失败!'
});
}
});
}
}
}
</script>
<style>
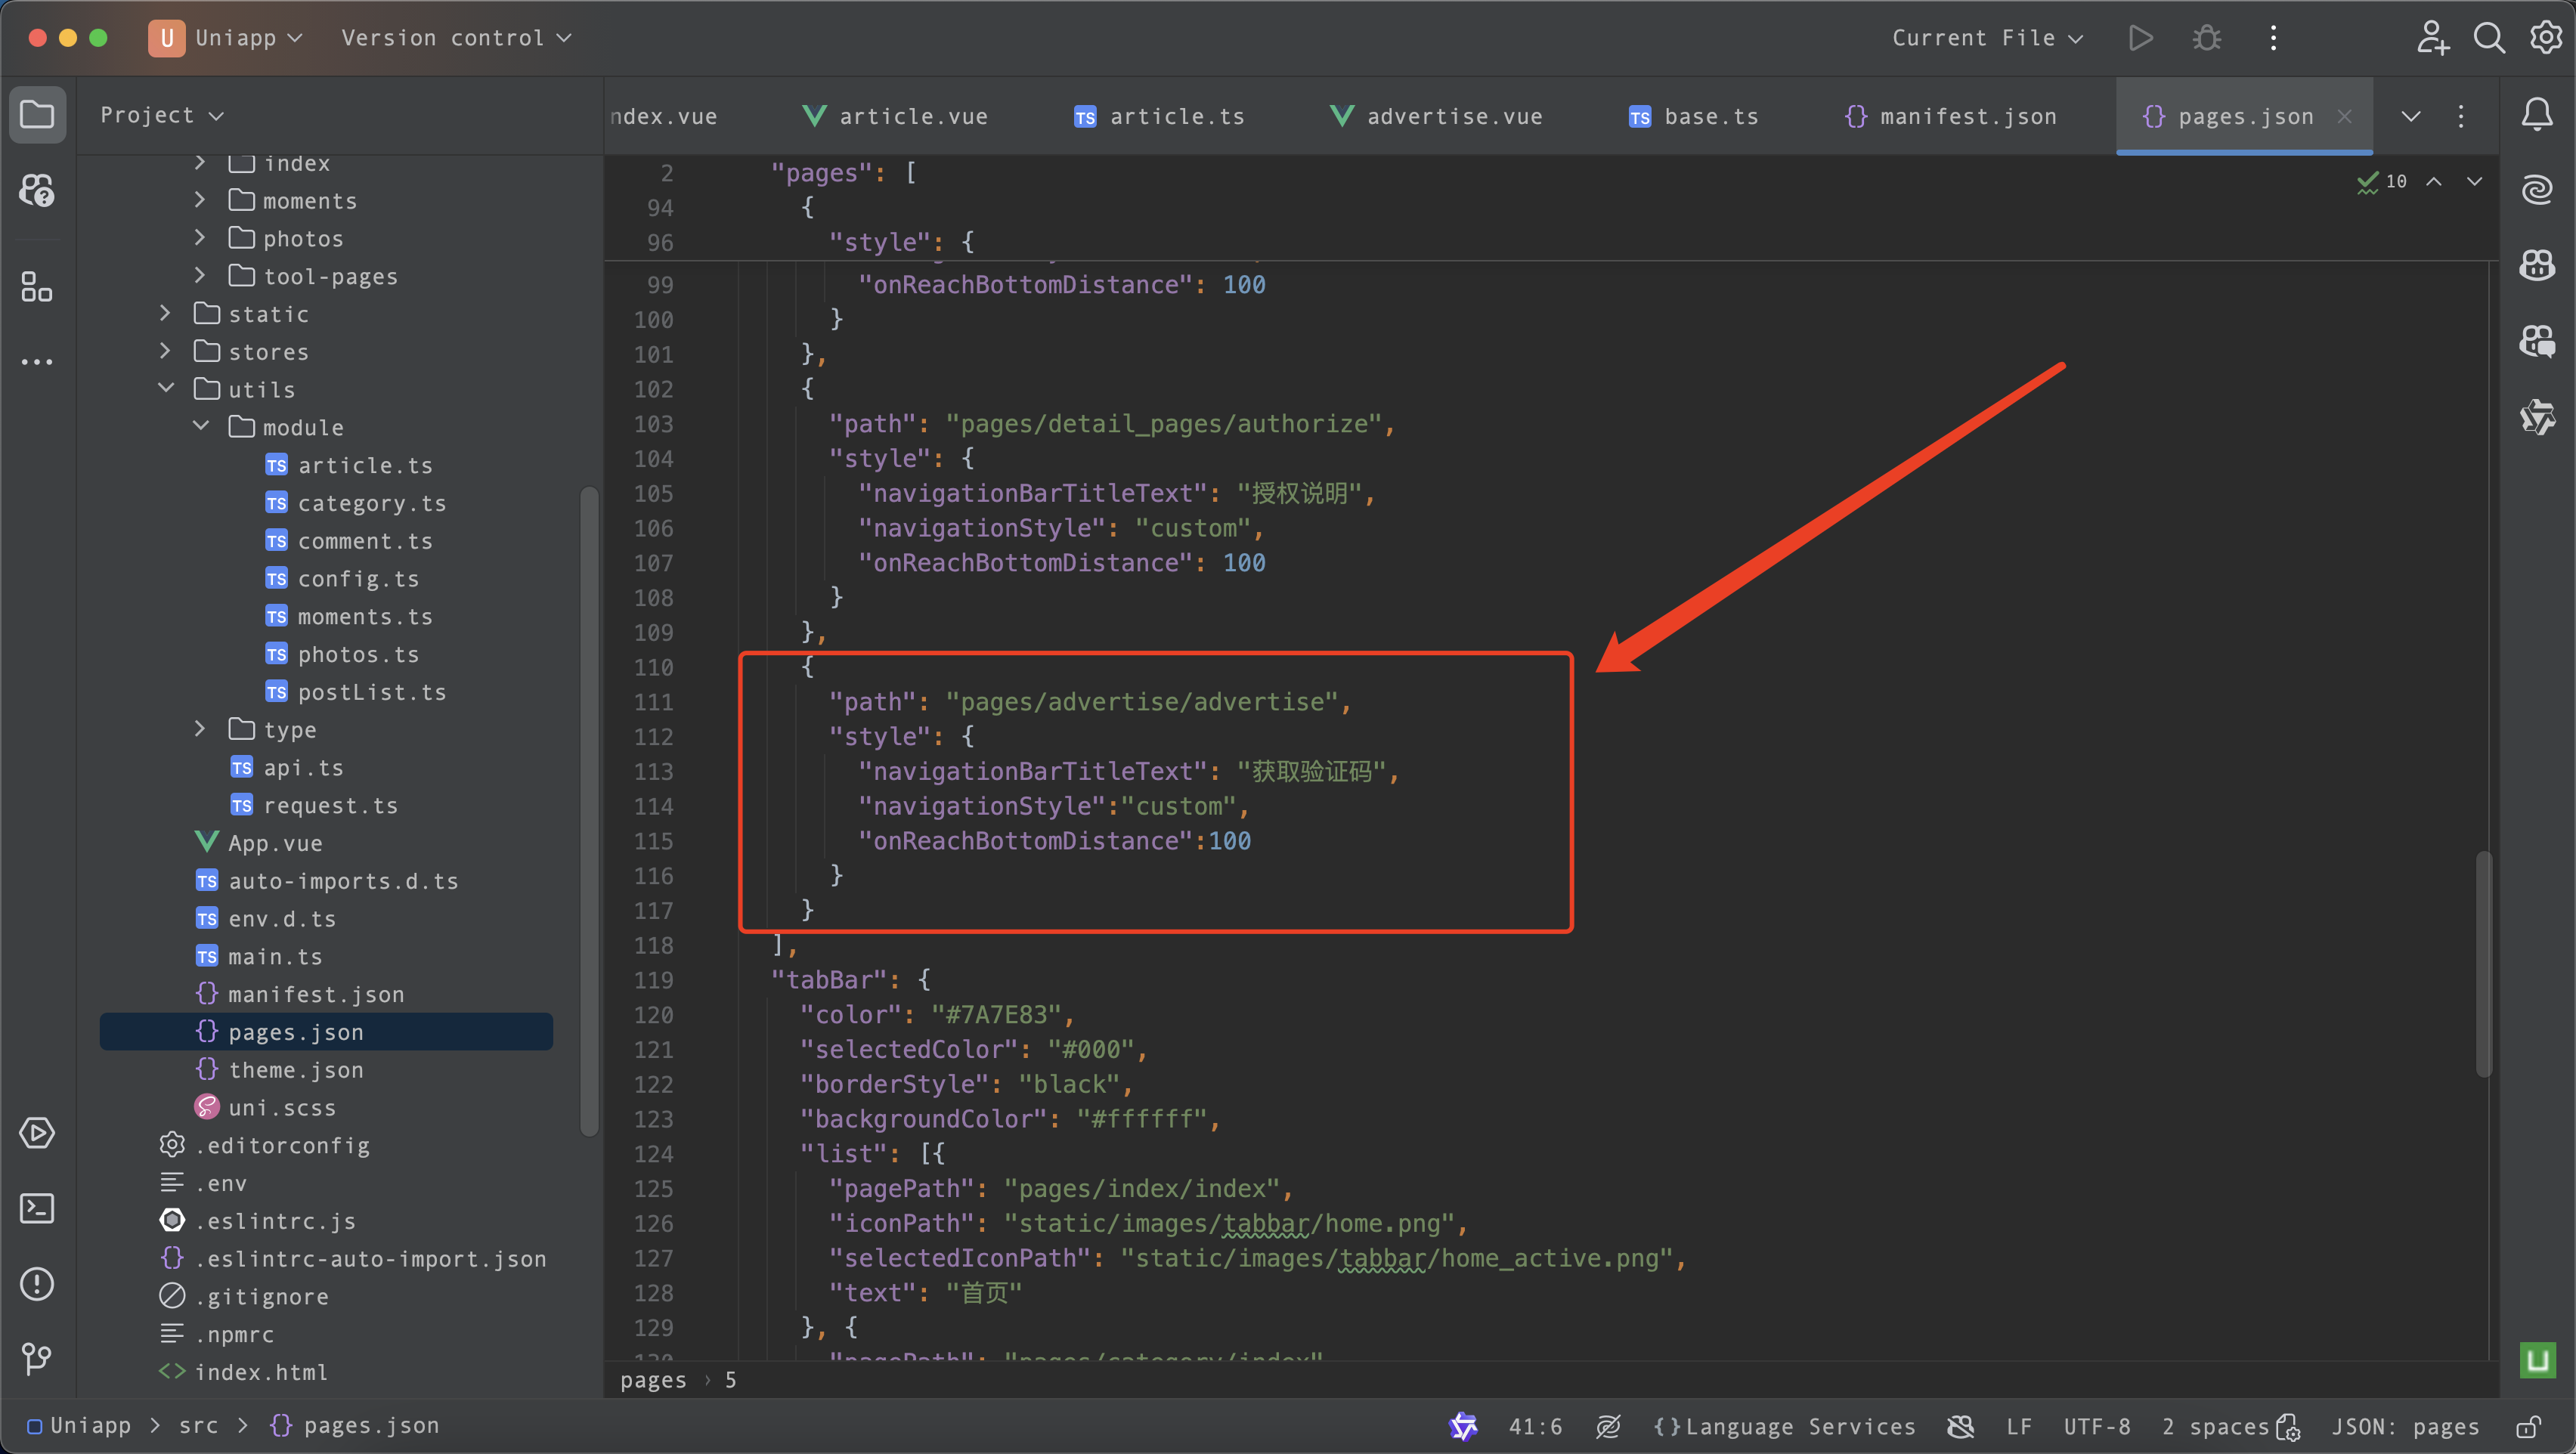
</style>在
pages.json文件中,插入如下代码:
{
  "path": "pages/advertise/advertise",
  "style": {
    "navigationBarTitleText": "获取验证码",
    "navigationStyle":"custom",
    "onReachBottomDistance":100
  }
}
代码插入位置如图所示:
第四步,代码中有几处需要修改的地方
调样接口时的请求头
Authorization,直接搜关键字Tools工具箱插件设置的认证token改成你自己设置的认证token视频广告id,直接搜关键字
微信小程序激励广告id改成你自己的广告id
修改文章验证方式:
如果觉得弹窗验证的方式繁琐,可以修改成直接观看视频成功后解锁文章,演示如下:

注意:上面代码修改的步骤不能省略,必须完成之后,才能继续接下来的步骤
找到
src/pages/detail_pages/article.vue页面,插入如下代码:
// 观看视频解锁文章-begin
let videoAd = null
const adUnitId = '微信小程序激励广告id' // 你的激励广告id
const adLoad = () => {
  if (wx.createRewardedVideoAd) {
    videoAd = wx.createRewardedVideoAd({
      adUnitId: adUnitId // 你的广告key
    })
    videoAd.onError((err) => {
      console.error('广告拉取失败', err)
    })
    videoAd.onClose((status) => {
      if ((status && status.isEnded) || status === undefined) {
        // 这里写广告播放完成后的事件
        postVerifyForAll()
      } else {
        // 广告播放未完成
        uni.showToast({
          icon: 'error',
          title: '验证失败!'
        })
      }
    })
  }
}
const postVerifyForAll = () => {
  uni.showLoading({
    title: '正在验证...'
  })
  service
    .get(`/tools/verificationCode/create`, {
      Authorization: 'Tools工具箱插件设置的认证token'
    })
    .then((res) => {
      if (res.code === 200) {
        verifyCodeForm.verifyCode = res.data
        checkVerifyCode()
      } else {
        uni.showToast({
          icon: 'error',
          title: '验证失败!'
        })
      }
      uni.hideLoading()
    })
    .catch((err) => {
      console.error('获取验证码失败', err)
      uni.showToast({
        icon: 'error',
        title: '验证失败!'
      })
      uni.hideLoading()
    })
}
const openVideoAd = () => {
  if (videoAd && adUnitId !== '') {
    videoAd.show().catch((err) => {
      // 失败重试
      console.error('广告拉取失败', err)
      videoAd.load().then(() => videoAd.show())
    })
  } else {
    postVerifyForAll()
  }
}
// 观看视频解锁文章-end
代码插入位置如图所示:

修改隐藏内容的代码,主要修改调用方法和文案,代码如下:
<!--  文章验证码-begin  -->
<view>
  <TnReadMore
    v-if="postVerifyFlag"
    expand-text="点击观看视频,解锁文章内容"
    expand-icon="lock"
    fold-icon="up-arrow"
    height="100"
    :before-expand="openVideoAd"></TnReadMore>
  <view class="postVerify-placeholder-block"></view>
</view>
<!--  文章验证码-end  -->
代码插入位置如图所示:

常见问题:
校验接口调用失败?
检查你的认证token是否正确;
广告加载失败?
开发者模式时,切换微信开发者工具的调试基础库版本,选择
development验证码复制失败?
小程序复制功能需要设置
用户隐私协议,参考文章https://juejin.cn/post/7282692088008261691plugin-tools-1.2.2 更新api,导致小程序文章验证码失败?
全局搜索
/tools/verificationCode/create,替换成/apis/tools.muyin.site/v1alpha1/verificationCode/create全局搜索
/tools/verificationCode/check,替换成/apis/tools.muyin.site/v1alpha1/verificationCode/check


评论